Light and scale
DXB202 Image Production Assessment 1
#oneperday week 7


Title: Tiger in the jungle
Technique: DSLR photography (NIKON D5000)
Process: a photograph was taken and then edited on Photoshop to adjust the contrast. ISO 400, f/5.6, 1/200 sec exposure time, exposure bias +0.3 step. The statue of the tiger is about 7cm tall and the setting was done in my backyard. Since the statue was very small and it was on the ground, I had to lay down and zoom in a lot to get the shot.
Reasoning: I found a little statue of a tiger in my brother's room. I remember buying it from the zoo a long time ago and it didn't have much use other than decoration. I thought it was the perfect opportunity to do micro-photography on it. I wanted to try to recreate the environment of what the tiger would live in to make it seem more realistic.
Reflection: micro-photography isn't too difficult in my opinion, as long as you have the props you need and the correct settings. Also, the getting down low and close for particular angles is very important. This image worked well because of the zooming and cropping. there wasn't a lot of difficulties with this activity, and I was able to find the perfect spot quite quickly that created the habitat for the tiger. The micro-photography worked well because of the zooming and cropping. The tiger fills most of the image and the background's role is to make the image more atmospheric. I want to continue to experiment with micro-photography because I think it is interesting and the concept of it is a challenge.


Title: It's a big world after all
Technique: DSLR photography (NIKON D5000)
Process: a photograph was taken and then edited on Photoshop to adjust the contrast. (1st image) ISO 400, f/5.6, 1/25 sec exposure time, exposure bias -0.3 step. (2nd image) ISO 400, f/4.8, 1/13 sec exposure time, exposure bias +1.3 step. (3rd image) ISO 400, f/6, 1/20 sec exposure time, exposure bias +1.3 step. (4th image) ISO 400, f/5.3, 1/25 sec exposure time, exposure bias +1 step. The little toys of Mickey, Minnie, Donald, and koala are about 4cm tall and everything else such as the TV remote, flowers, and blenders are average sized. Since these props were very small, I had lower myself down to get to eye level.
Reasoning: with the mini toys I found around the house, I wanted to make them seem like they are normal sized, while everything else, such as normal daily objects, are massive.
Reflection: to achieve micro-photography, I had to get down low to eye level which will manipulate the viewer's mind. It will allow the audience to focus on the small object and see everything else as a background. Zooming in close and filling the frame with the small object is a technique for micro-photography. Because the objects were extremely small and had to be zoomed in a lot, the camera had difficulties with focusing on the object. There was also the risk of motion blur from small movements and it was hard to stabilize. This activity was quite difficult but after a few attempts and shots, I was able to get an image successfully.
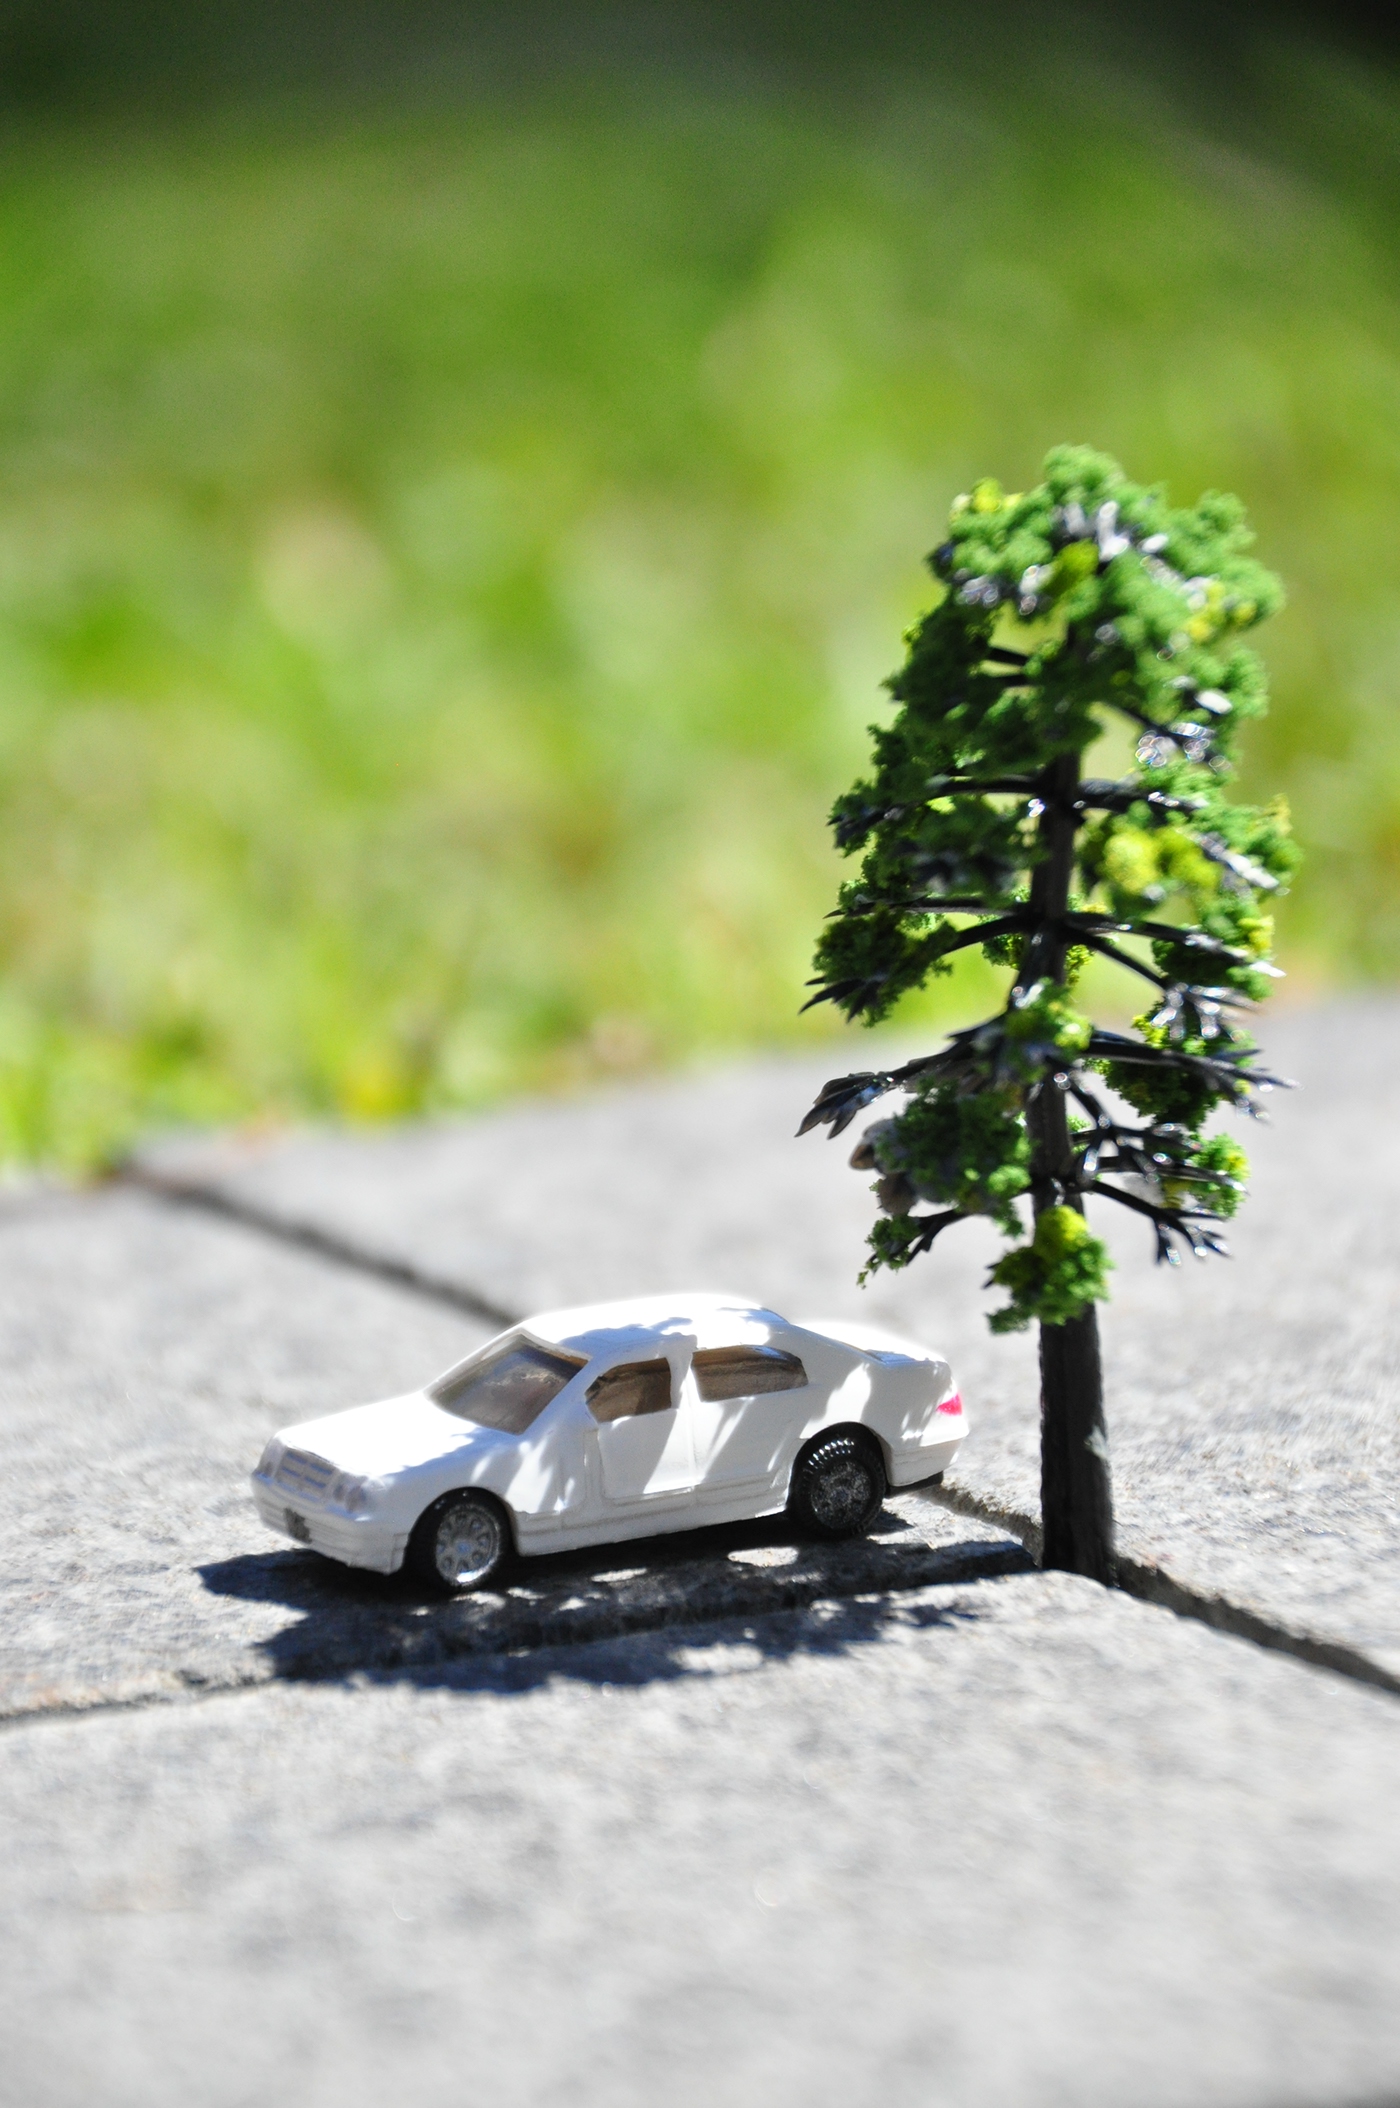
Title: Little car
Technique: DSLR photography (NIKON D5000)
Process: ISO 800, f/6, 1/1600 sec exposure time, exposure bias +1.3 step. The toy car is about 2cm tall and the tree was about 6cm tall. Since the props were very small and it was on the ground, I had to lay down and zoom in a lot to get the shot.
Reasoning: this image was taken during my DXB202 class and the props were my teacher's. We chose the car and the tree because my group that it could perfectly create a scenario using micro-photography. We positioned the car right next to the tree to make it seem realistic as if the car is parked under it.
Reflection: micro-photography isn't too difficult in my opinion, as long as you have the props you need, the correct camera settings, and it usually takes a few shots to get the perfect image. Also, the getting down low and close for particular angles is very important. This image worked well because of the zooming and cropping. The props fills most of the image and the background's role is to make the image more atmospheric.

Title: Glowing angel
Technique: DSLR photography (my friend's camera)
Process: a photograph was taken and then edited on Photoshop to adjust the contrast. ISO Lo 1, f/5.6, 30 sec exposure time. The camera was set on a tripod and put on manual focus. After the button was clicked, I ran over and used my phone torch to draw the angel wings and halo.
Reasoning: this image was taken during my DXB202 class and our group took turns to do some light painting on each other. I decided to paint angel wings and a halo on my friend because the when I think about light, I get reminded of either an angel or fairy. I thought it would look cool if I made someone an angel/fairy.
Reflection: light photography isn't too difficult in my opinion, as long as you know what you want to capture or maybe experimenting to get an unexpected result. Either way, all you need to do is set your camera on a tripod, lower the ISO, and set the exposure time long enough to capture the movement of light. I want to experiment with light photography a little more in the future to capture the night sky and moving cars in the city.


Title: Lights at night
Technique: DSLR photography (NIKON D5000)
Process: (1st image) ISO 3200, f/11, 3 sec exposure time, shot through a netted window. (2nd image) ISO 3200, f/16, 3 sec exposure time, shot through a netted window. (3rd image) ISO 160, f/6, 20 sec exposure time, set on tripod, shot outside. (4th image) ISO 3200, f/14, 5 sec exposure time, shot through a clear window. Manual focus was used since camera will have trouble focusing if set on auto.
Reasoning: after seeing people take amazing light photography of the city and stars, it made me want to try it out too but I didn't have the time and transport to go to places to take photos; I had to experiment at home.
Reflection: taking these images in the dark was quite a challenge for me since I have never done it before. There are lots of things to set up for the camera. Usually, the results you get are quite unexpected. (1st & 2nd image) on the 2nd floor of my house, there is a nice view of the city but it there was only one window that was facing in that direction and it was netted. I decided to try it out and see would happen. Interestingly, the nets made a cool mask on the lights, making them seem pixelated. I also wanted to see what it would look like if I moved the camera a little. (3rd & 4th image) when I went out to take a look at the sky, I saw many planes fly past. I thought "what if I tried to take light photos of the plane?" and ended up with a cool lines of light. The effect in the 4th image was a light reflection on the window and I thought it made the image look more captivating.

